CPU throttling & thermal throttling explained: What are they and how can you fix them?
When it comes to PC hardware, there's nothing worse than wasted performance. Especially when it's easily addressed. CPU throttling is a fairly common occurrence that many PC and laptop users can encounter, but often they're simply left wondering why their system feels more sluggish than it should.

Today, we'll be talking about what exactly CPU throttling is, thermal throttling and why it's often incorrectly used to describe the former, as well as ways to identify and address them effectively. We'll also cover why CPU throttling isn't always a bad thing, and how it actually helps keep a system cooler.
CPU throttling and thermal throttling - what's the difference?
CPU throttling and thermal throttling are often used interchangeably to describe a processor which is operating slower than expected, and are generally associated with systems that are running too hot. Though this is not totally off the mark, it's also not entirely correct. They are very closely related in this regard, but there's an important distinction to be made between the two.
CPU throttling refers to a technology called Dynamic Frequency Scaling, whereby the processor limits its power draw under certain circumstances. This function is used by processors to strike a balance between clock speeds, power draw, and safe operating temperatures, in order to keep the chip as efficient as possible.
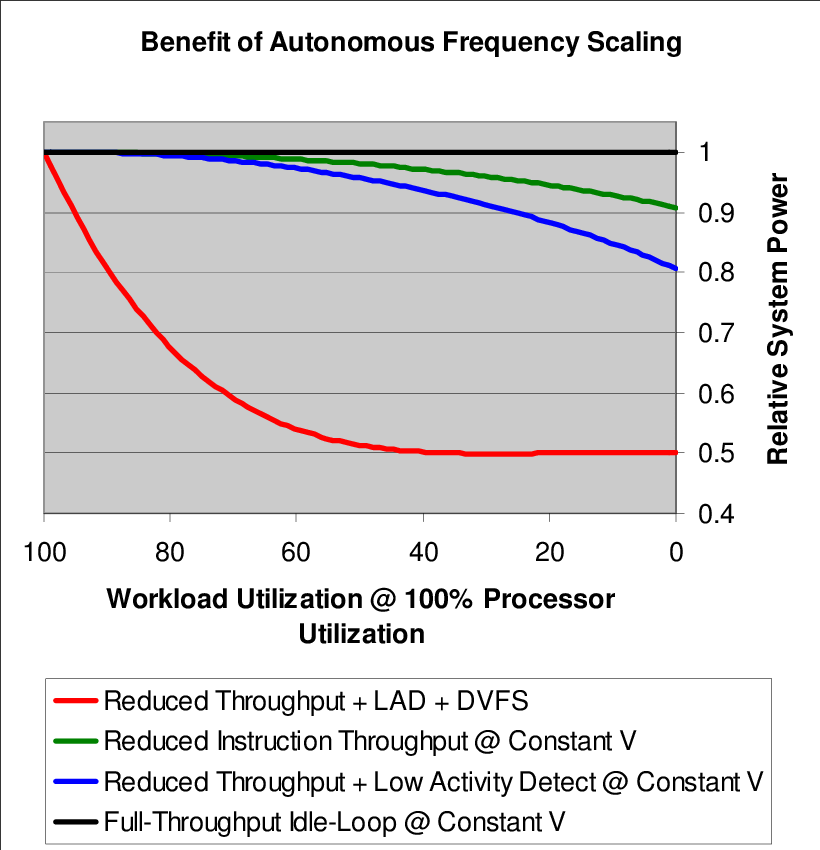
For example, in lightweight workloads and everyday tasks, many processors can dial down their frequency to as low as 1GHz, only ramping up to their advertised speeds in CPU-heavy workloads, like gaming and data compression. This results in a system which is more power efficient, cooler, and therefore quieter too (since your CPU and system fans won't need to work as hard).
Thermal throttling, on the other hand, is a term that refers to a CPU which is throttling as a direct result of poor temperature management. In other words, the CPU is working as intended (by stepping down its voltage and frequency to maintain safe operating temperatures), but it's clear the system has an issue with overheating.
Is CPU throttling Bad?
The short answer? No. CPU throttling isn't bad per se, as it's simply the processor doing exactly what it should be under the circumstances. However, it does mean that your system won't be performing at its best, meaning productivity workloads could take longer to complete, and framerates will certainly be much lower in gaming.
It's by no means the worst problem in the world - in fact, many people will be using CPU throttled systems on the daily without even knowing. Depending on the severity of the throttling, as well as when it occurs, it may not have much impact on their lives at all.
The real issue arises when a system is thermal throttling. Not only will poor thermals cause CPU throttling, but it can also be an indicator that your PC is running too hot in general, and could suggest that the system cooling solution isn't sufficient. This could result in system temperatures rising too high under heavy workloads and force the processor to exceed its T-Junction rating (i.e. maximum safe temperature), which can lead to sudden and unexpected whole system shutdowns. And that's very bad indeed. For your system in the long run, and your sanity too.
How to check if your CPU is throttling
So you think your processor might be throttling? But how can you actually identify this? Fortunately, it's extremely easy; Windows 10 includes a basic hardware monitoring tool that you can use to quickly identify whether your CPU is throttling:
Press the Windows Key + R to bring up the Run command box.
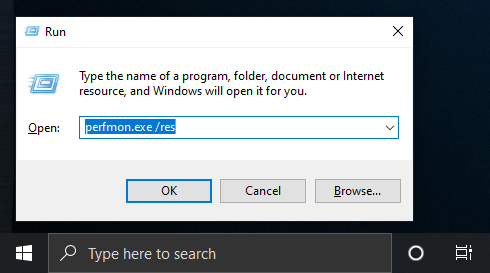
In the available field, type "perfmon.exe /res" and hit Enter. This will open the Resource Monitor.
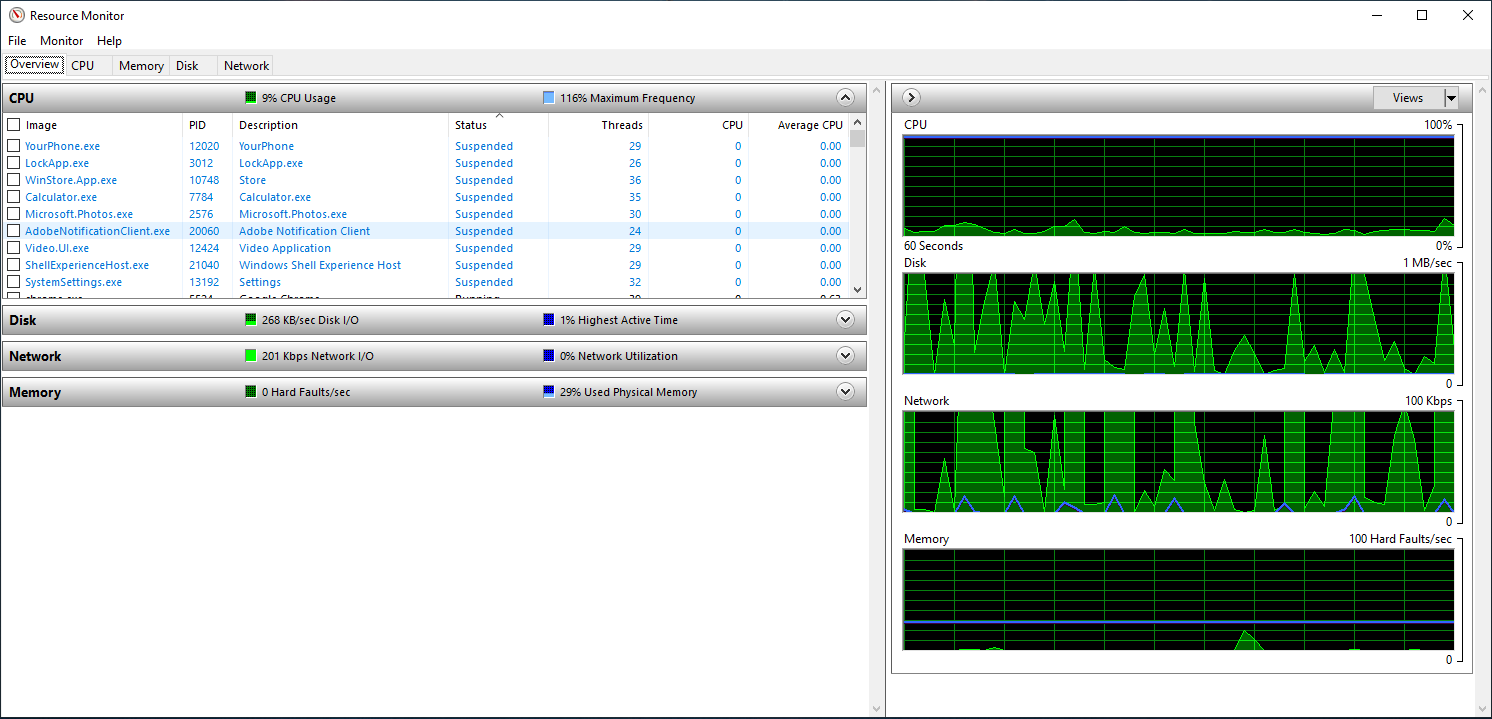
Use your system as you normally would - ideally, try a variety of programmes with different hardware demands.
In the Resource Monitor, look for the little blue square in the top right, labelled Maximum Frequency. This percentage value will indicate the current speed of your CPU relative to its base clock speed, and corresponds to the blue line on the graph to the right. If the percentage appears to cap out at a given value, then your CPU is throttling.
But as we mentioned earlier, just because your CPU is throttling, it doesn't necessarily mean that it's being thermally throttled...
Why is your CPU throttling?
A quick and easy way to solve CPU throttling is to start by checking your Windows Power Plan. As mentioned earlier, throttling is a process that manages frequency and temperatures, which it does by regulating voltage. In other words, if it draws less power, it runs slower and cooler. And as you may have already guessed from the name, Windows Power Plans can alter the maximum allowed voltage of your processor.
How to stop CPU throttling in Win 10
Go to Control Panel > Hardware and Sound > Power Options:
You should see three available options to choose from: Power Saver, Balanced and High Performance.

Check which Power Plan is currently selected. The Power Saver and Balanced modes will both throttle your CPU under different circumstances, in order to save power, lower temperatures, and reduce overall system noise. Though this primarily affects the CPU whilst it is idle or performing minimal tasks, it can affect performance in other applications too, such as gaming or creative softwares like those included in Adobe Creative Cloud. So if either of these plans are currently selected, choose the High Performance option instead.
Alternatively, with your currently selected Power Plan, navigate to:
Change Plan Settings > Change Advanced Power Settings > Processor Power Management
Then, check under the Minimum and Maximum Processor State Policies.
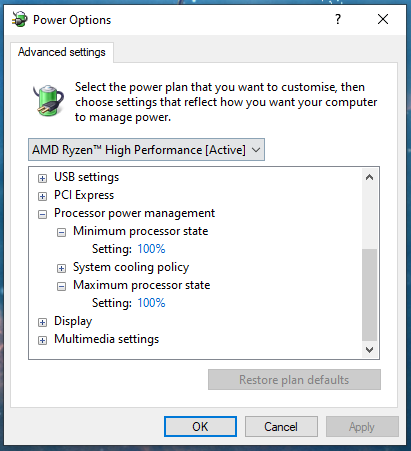
If the percentage values are below 100%, this will be the likely culprit for your CPU throttling. You can set these values as you see fit, but for a guaranteed result you should at least set the Maximum Processor State Policy to the full 100%.
Whilst in this menu, it will also be worth checking under the System Cooling Policy. If it is set to Passive, change this to Active. This will ensure that your system makes proper use of system fans to keep the processor cool, instead of throttling the CPU as soon as it reaches higher-than-idle temperatures.
You can then check whether your CPU is still throttling by repeating the method in the section above.
If the issue still persists, or if you're just interested to learn a little more about the inner workings of your PC, then the next step is to check your system's thermals.
How to check if your CPU is thermal throttling
First, you'll need to download a hardware monitoring tool, such as CPUID HWMonitor or HWiNFO. For beginners to system diagnostics, I'd recommend going with the former as it's easier to navigate and see where everything is at a glance.
Follow the set-up and create a desktop shortcut if you wish.
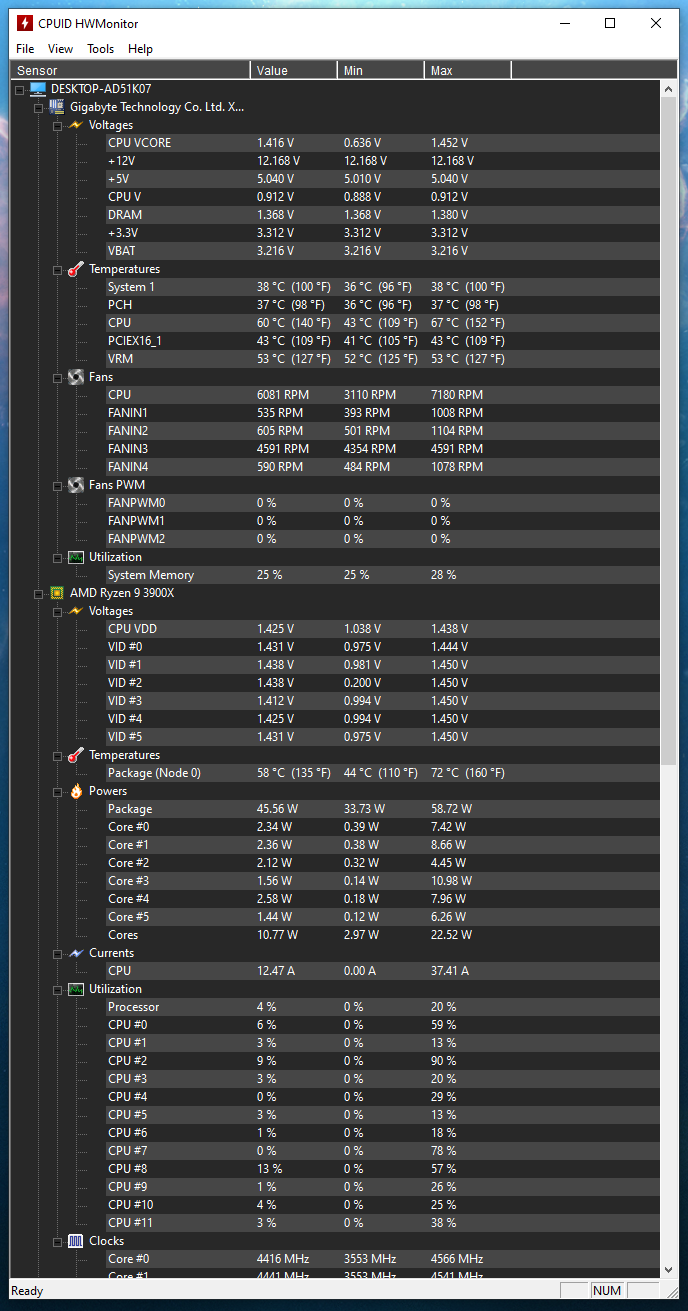
Launch the application. It should look something like this:
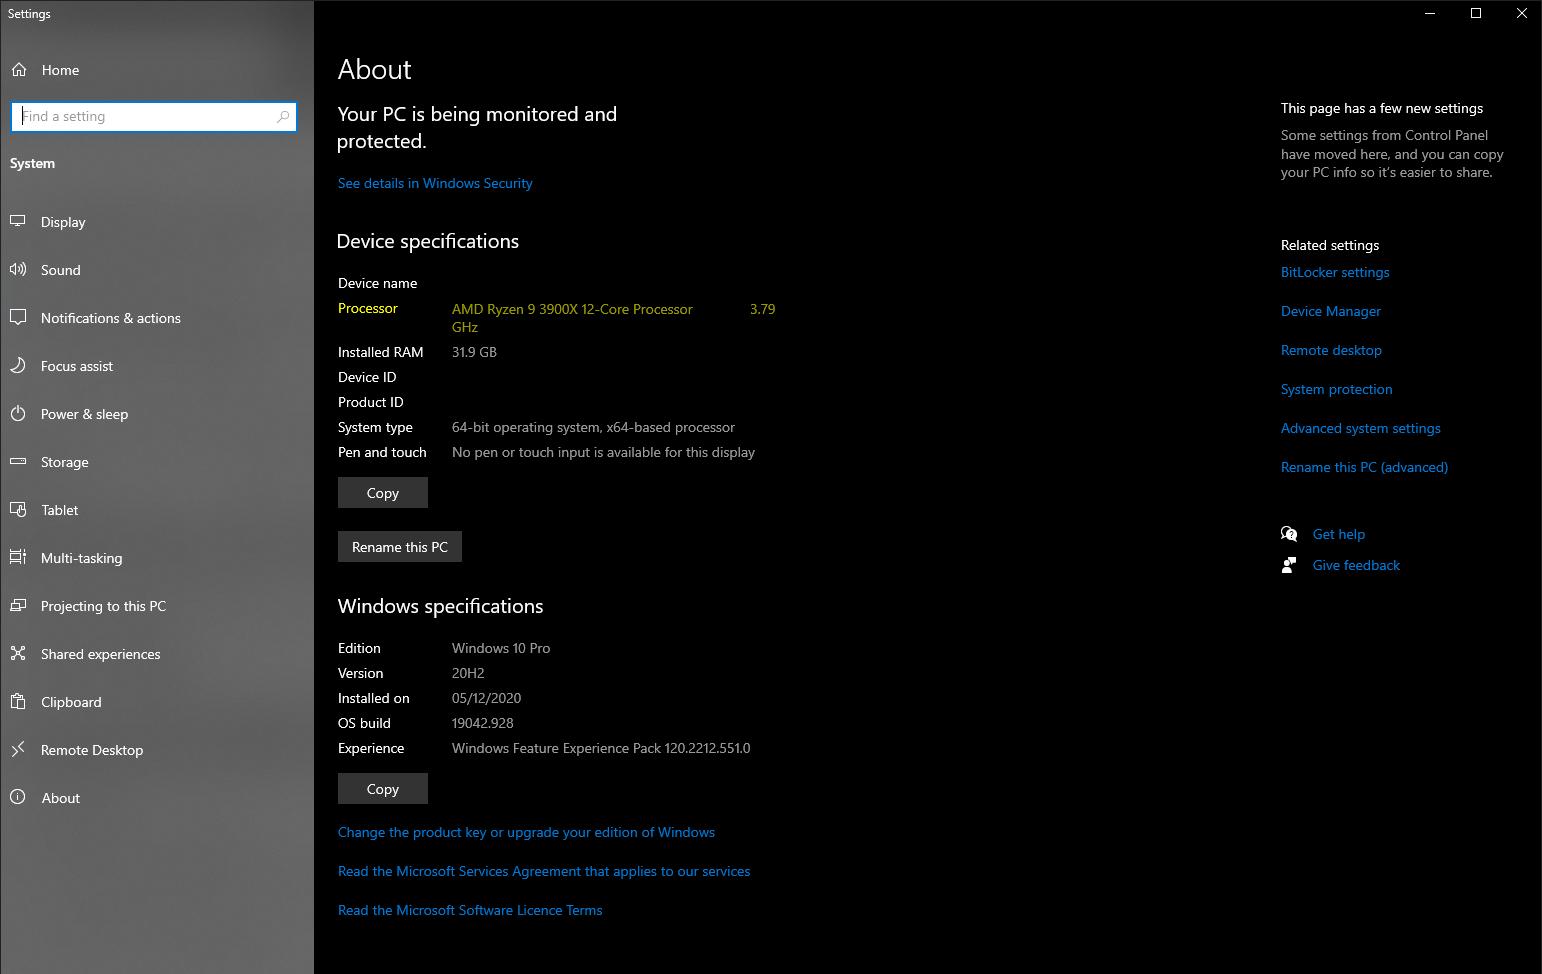
Scroll down until you see the name of your processor. If you aren't sure, you'll most likely be looking for either an Intel Core, AMD Athlon, or AMD Ryzen, followed by several numbers. If you want to find out for certain, press the Windows Key + Pause Break on your keyboard to open your PC's About Panel. Your CPU model will be listed here:
Under the CPU section of HWMonitor, you should see three temperatures listed; the current, minimum, and maximum temperature of your CPU "Package". These temperatures will vary depending on which processor you have, as well as the efficacy of your cooling solution. The main thing to pay attention to though, is the current and maximum temperatures. If, whilst idle, your CPU already appears hotter than it should, then this is a good indicator that something is awry with your cooling solution.
You can also cross-reference these temperatures by checking the manufacturer spec to see the maximum operating temperatures of your CPU. For Intel, these can be found at Intel's Ark, whilst AMD will list the relevant specifications on their individual product pages. When idle, an average consistent temperature between 30-50°C is fairly normal, but anything over that could be a cause for concern.
Assuming that there isn't an obvious or alarming thermal problem whilst idle, as before, use your system as normal, as well as performing some particularly CPU-heavy tasks if you can. You could download a benchmarking tool such as Cinebench, but even just a modern turn-based strategy game with a lot of AI players can do the trick.
Keep an eye on those temperatures throughout to see how it fluctuates between light workloads and intensive workloads. As a rule of thumb, when your processor is under heavier workloads, ideally you don't want to see anything over 70-80% of the processor's max rated operating temperature. You'll also want to check the Windows Resource Monitor again. This is where you'll be able to compare and see any correlation between the Maximum Frequency of your processor and temperatures under different loads.
If during your testing you find that the Maximum Frequency does drop significantly below 100% whilst the CPU is at those higher temperatures, then chances are your system is indeed thermal throttling.
How to stop thermal throttling
As we've now established, thermal throttling occurs as a direct result of your processor overheating. But what exactly can cause overheating in the first place? The main culprits are usually:
Poor airflow - either from an insufficient cooling solution, or excessive dust build-up, which can clog fans, ventilation, and heat sinks.
Fans - which are broken, obstructed, incorrectly installed or using RPM settings that are too low.
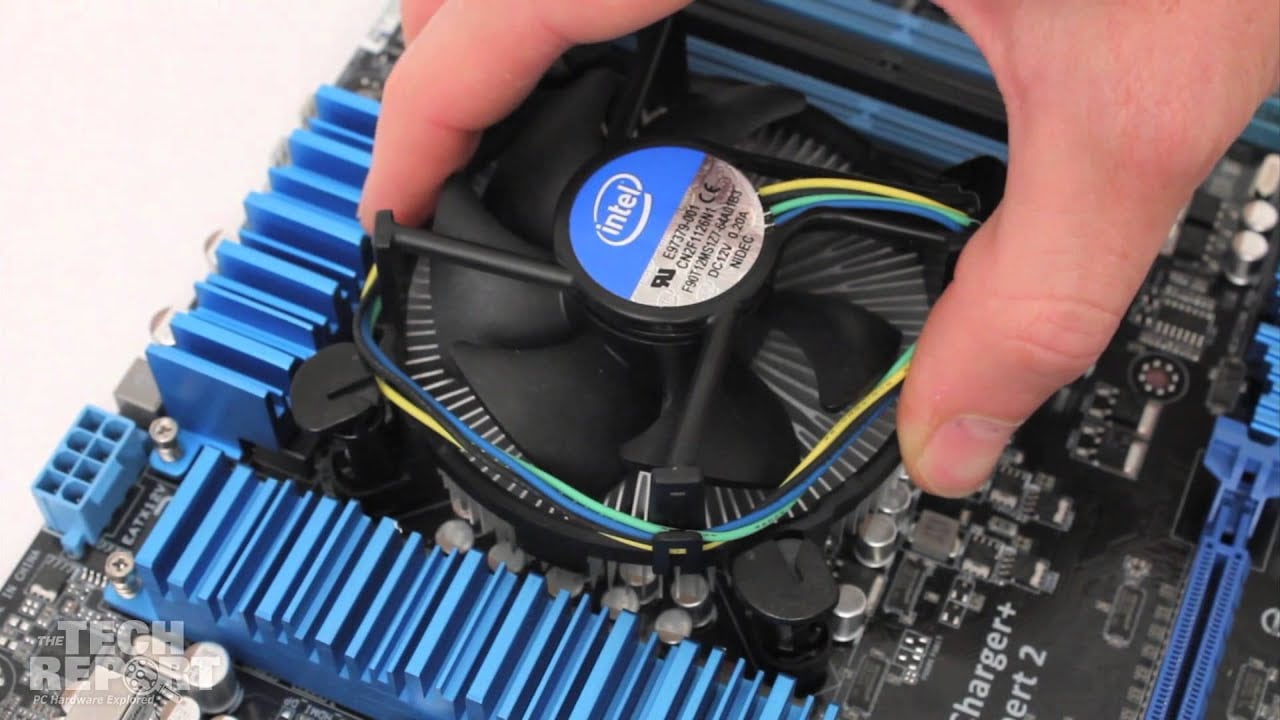
An incorrectly mounted CPU heat sink - meaning the cooler is not making proper contact with the processor.
In the case of water-cooling - poor cooler orientation, broken pumps, or else evaporation of the cooling fluid over time.
Keep It Clean
One thing that many everyday PC users will never do is clean their system. It might come as a surprise to some, but trust us, we've seen a lot of cases that are so full of dust and fluff that we could hardly make out what hardware was even in the machine.

Besides risking the loss of all your earthly possessions in a nasty electrical fire, dust build-up in a PC can wreak havoc on thermals. It insulates your components, packing out heat sink fins and effectively negating any cooling potential they provide, can block air intake and exhaust vents, and can damage or even completely break your fans over time, if they use fluid bearings.
So, if you're having thermal problems and haven't looked under the hood for a long time, please do so. Your PC, your lungs, and the fire brigade will thank you.
It's easy enough to do, with a few different options, but by far the most effective is usually a trusty "Can of Air," which is essentially just a high-pressure aerosol that will blast away dust build-up with no problem.

Make sure you also clean the PC somewhere with good ventilation, to help prevent the dust from resettling in the case and to minimise the chance of uncontrollable sneezing fits. Of course, before cleaning or fiddling with anything in your system, please be sure that the machine is completely powered down and unplugged beforehand.
Once your system is fresh and dust-free, double-check that wherever you put your PC allows for unrestricted airflow. In other words, try to keep the system clear of carpets with tall piles, or enclosed spaces that will trap hot air being exhausted from the computer. This should help ensure that the system can move as much cool air as possible through the case and over its components, thus aiding in the cooling of your processor.
Fans
If you're giving your PC a bit of a spring cleaning, then whilst you've got the case open, you can check that your fans are working properly too. For those that don't have any fancy glass side-panelling, take the opportunity to boot the system up with the panel off. You'll be able to see if all fans are spinning once the system has fully initialised, as well as whether they're getting stuck or catching on any nearby cabling. Then you can address the issues accordingly, whether that be by adjusting cable positions and clearing any other obstructions, or replacing the fans entirely.
How your fans have been mounted is another thing worth checking. Without naming any names, there are some system builders that are notorious for building PCs with small oversights, such as the orientation of the case fans. If you're using a system that only has one exhaust fan, it's important that it is in fact exhausting air.
To check that your fans are correctly orientated, start by identifying which fans in the system are acting as intakes, and those that are acting as exhausts. Generally speaking, intakes will be situated at the front of the case, whilst exhausts will be mounted at the back and top of the case. Then, confirm the direction that the fans are facing by looking for this cross-shaped grille.
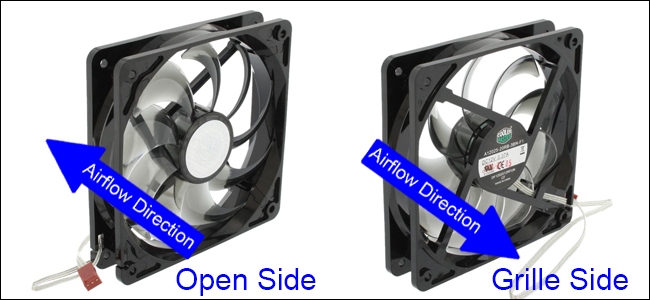
If the fan is exhausting air, it should be mounted such that this side of the fan is facing out of the case. If it's facing inwards, then the fan is not exhausting at all, but instead bringing cool air in. The main thing to check here is that no two fans are directly opposing each other; for example, if your CPU cooler fans are pushing air to the rear of the case, then a rear mounted fan should also be exhausting that hot air too.
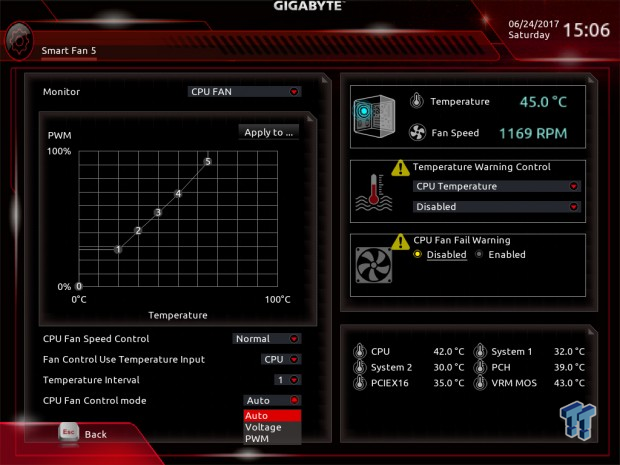
Lastly, it is possible that your system fans could be spinning slower than they should. Sometimes, fans will be set to spin slower than their maximum speed in order to keep the machine quiet. Of course, this can negatively affect thermals as a result, especially under heavier workloads. This can be changed by altering the "fan curve" either through your motherboard BIOS, or a third-party software. If you've never had any experience using motherboard BIOS before, check the manufacturer's website. Many offer their own Windows 10 software for editing settings via your desktop.
CPU Heat Sink and Water-cooling
If you've cleaned out your system, addressed any fan-based issues, and are still having problems with high CPU temperatures, then the culprit could be your CPU cooler.
The most common issue with a CPU heat sink is when it isn't fully seated on the processor. This can happen for several reasons but is most often the result of an improper installation. In any case, what this means is that the cooling plate is not making full contact with the CPU and so heat generated by the processor cannot be properly transferred to the cooler. In this instance, the cooler will need to be removed, and the thermal paste cleaned from both the cold plate and processor, then re-applied before attempting to reseat the heat sink. This is not the easiest process, especially for a novice, and we would recommend talking with an expert who can help assess the situation, as well as potentially re-install the heat sink if this does turn out to be the problem.
If, however, your system happens to use an AIO water-cooling solution, there could be additional causes for thermal throttling. Due to how AIOs are designed, there are three additional problems that can occur.
The first and most common issue is poor orientation of the water block and radiator. We discussed the correct way to mount AIOs in a previous post, but in essence, if poorly orientated, the cooler can run into problems with air pockets in the pump. Besides being awful for the pump's lifespan, it also restricts the ease with which it can move water through the loop, reducing the effectiveness of the cooler.
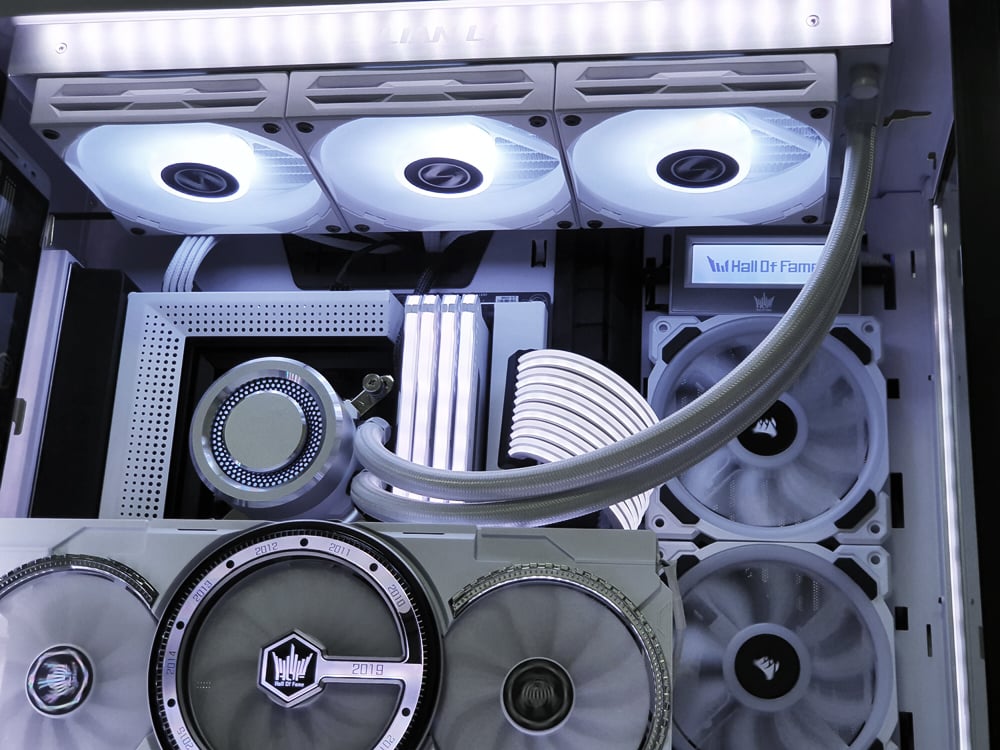
The second potential issue can occur after a few years of very regular use, where water in the loop has slowly evaporated over time, resulting in a far less efficient cooler. If this happens in conjunction with poor orientation, it's even possible that the AIO will stop moving water through the loop altogether, rendering it useless. This can be rectified by refiling the loop with an appropriate cooling fluid, provided the AIO offers a means of accessing the loop. If it does not, then the cooler will need to be replaced.
The last, and usually worse of the three, is a total pump failure. If the pump ceases to function then water will not be moved around the loop and through the radiator, thus no heat is being transferred away from the processor. This should be more obvious though, as generally speaking, systems using an AIO are running powerful processors that generate a lot of heat; if the AIO pump fails then those processors will very quickly hit their maximum temperatures which will result in a system shutdown.
Depending on your skill level, playing around with your PC's hardware can be rather nerve-wracking. So, if you suspect any of these issues could be the cause of your thermal throttling and don't feel comfortable handling and reinstalling PC hardware, then do contact an expert. We happen to know a few too, who you can get in touch with either online or by phone here.
As a final note, it is possible that there is nothing fundamentally wrong with your CPU cooler. Oftentimes, some models of CPUs are shipped with stock coolers which aren't as effective as they could be. Sure, they might be able to keep the processor cool under lighter workloads, but they can end up relying on CPU Throttling a little too much when things get difficult. Naturally, an easy fix here is to simply upgrade your cooler to one with a bit more umph. A quick way to find out what sort of cooler will be sufficient is to use the TDP rating of your processor. CPU coolers will have a maximum rated wattage for which they are effective, so all you need to do is ensure that wattage rating is higher than the listed TDP of your processor.
That's all folks
Hopefully, by now you've managed to narrow down the source of your CPU throttling. Whether that was Windows Power Plans hoarding away volts, or a fluffy dust blanket getting your processor all hot and bothered! As with anything in the world of computers there's a lot of troubleshooting involved, but with any luck, this guide has helped give you some good places to start.
As always, if you have any questions for us or thoughts to share, leave them down in the comments below!
Posted in TechShot
Published on 05 May 2021
Last updated on 17 Jan 2023