10 Ways to Increase FPS & Optimise Windows 10 for Gaming
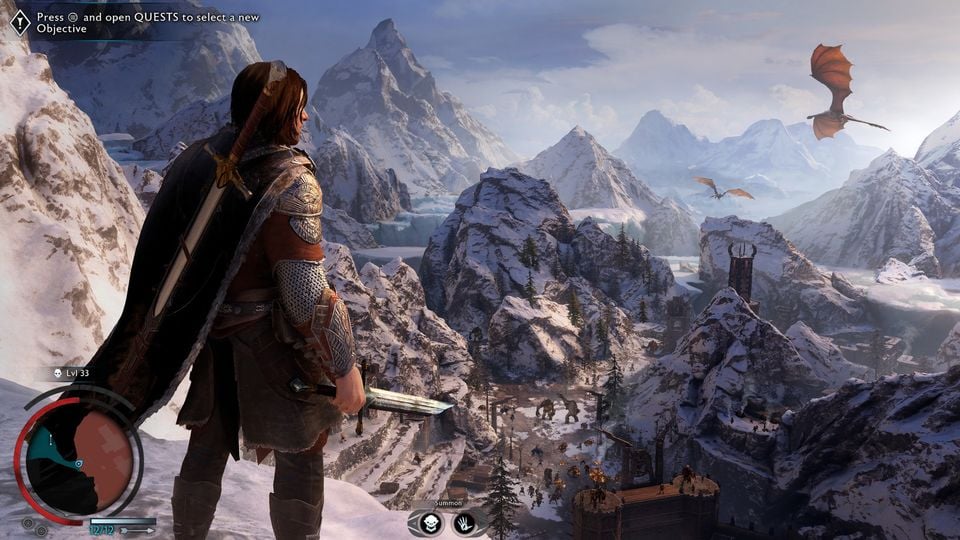
Over the last decade, video games have steadily evolved into visually stunning masterpieces, depicting entire worlds in ways more real and in-depth than ever before. From the obligatory annual Call of Duty games to the labour-of-love RPGs like the Witcher 3, the devil really is in the details for their massive, complex environments and life-like characters.
Whilst nobody is ever averse to the eye-candy these games offer us, many are acutely aware of the performance impact this can have on their PC. And these performance hits aren't just exclusive to low-end budget systems either; even high-end gaming machines can start to struggle once they enter the realms of 4K and Ray Tracing.
So how can we improve a PC's performance in gaming, and more specifically, how can we increase our FPS? Well, whether you're playing Minecraft, Fortnite, or Cyberpunk 2077 maxed out, we've got some great tips on how you can best optimise not only your hardware, but also Windows 10 and the games themselves.
But before we get into the nitty-gritty of optimising in-game settings and hardware tuning, there's one very important thing to check first...
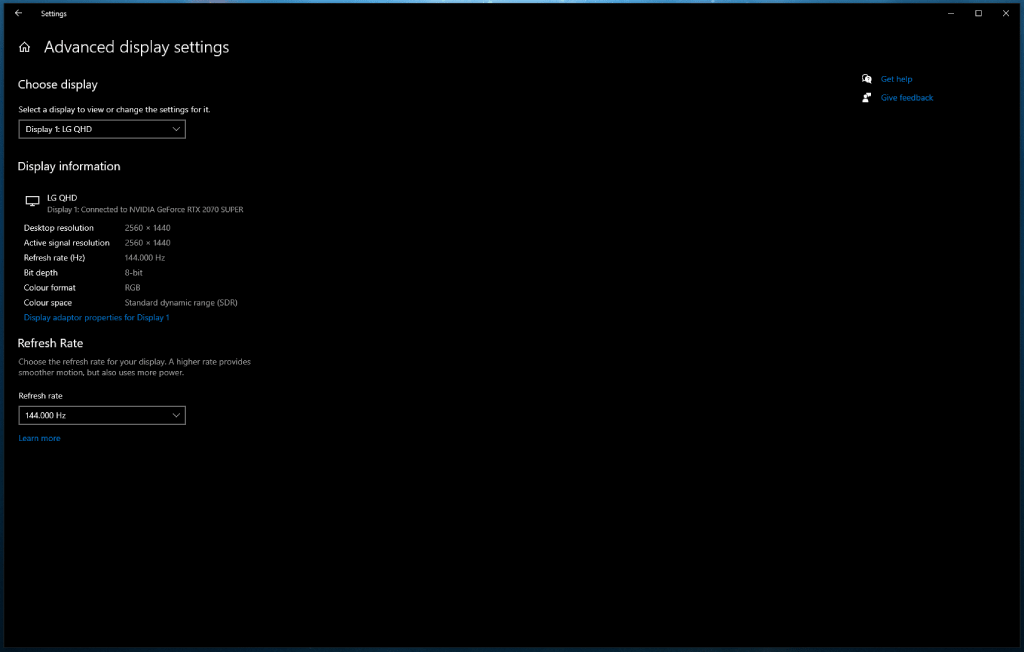
 Your monitor refresh rate
It seems like an obvious one to anybody even slightly tech savvy, but you'd be surprised how many people don't realise that FPS is inherently tied to monitor refresh rate. For the uninitiated, a monitor's refresh rate determines how many FPS it can actually display. So, if your monitor is limited to 60Hz, either at the hardware level or artificially through Windows 10 settings, you'll never be able to see any frames above 60fps, even if your GPU can push out more.
To check and change the refresh rate of your monitor, simply right-click the desktop and select Display Settings, then Advanced Display Settings. This will show you what refresh rate your monitor is currently running at, as well as provide a drop-down menu where you can choose your desired refresh rate (which arguably should just be the highest available option).
Once you've confirmed how many frames you can in fact see, then it's time to delve into tweaking and tuning the rest of your system.
DLSS and FSR - the best way to increase FPS
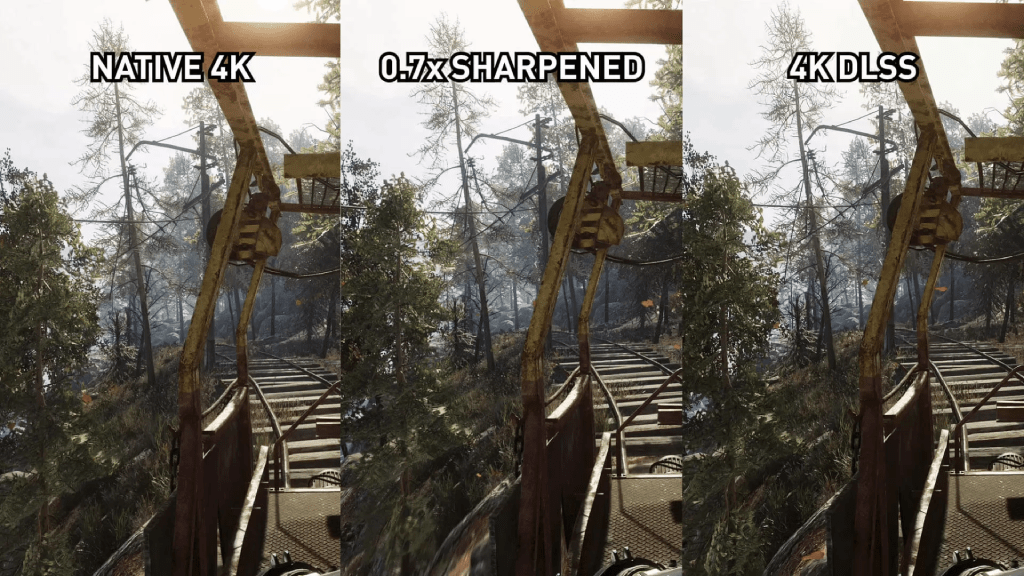
When it comes to squeezing every last frame out of your hardware, whilst still maintaining the highest visual fidelity possible, your first stop should always be one of these software-based solutions. DLSS from NVIDIA, and FSR from AMD, are two fantastic ways to increase your PC's performance without having to do much more than flicking an on-switch in supported games.
The way these two technologies work is by rendering the game at a lower resolution (which is less demanding) and then using a variety of very clever techniques to "upscale" the image quality so that it still appears to be running at your preferred resolution. Both offer multiple levels, allowing you to decide whether you want to preserve image quality as much as possible, maximise frames at any cost, or to find a balance between the two.
The reason these two features are so fantastic is that they can legitimately take a game from being totally unplayable, to a 60fps+ dream for many gamers on any level of hardware. And all just by enabling the setting in-game. Pretty amazing stuff.
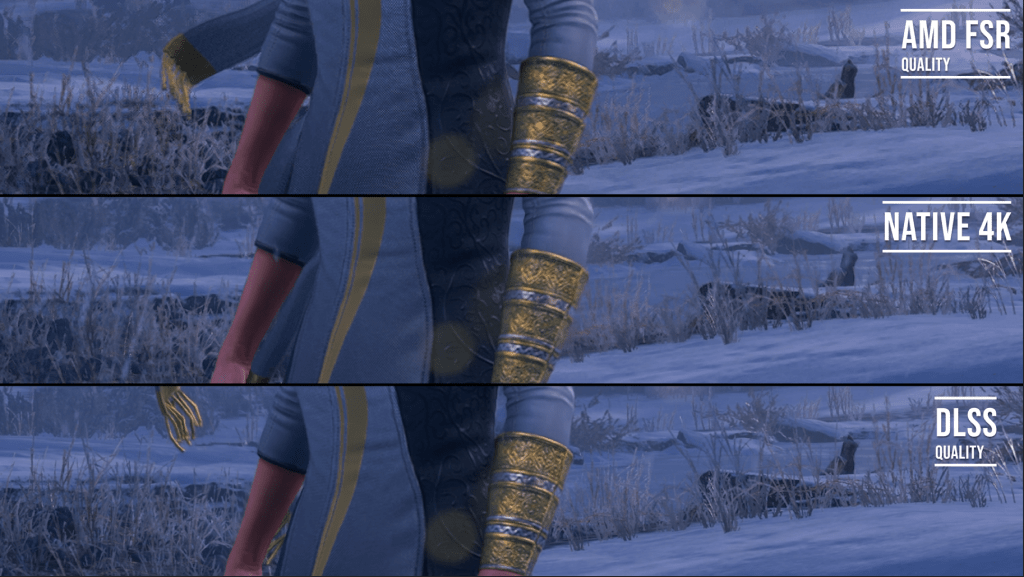
The biggest downside to these two options however, is that you will have to rely on the games you play supporting the feature. As of right now, there are many more DLSS enabled titles around, since FSR was only recently released. But with time, both features should start to see more and more support, particularly FSR, which has been alleged to be far easier to implement, giving game developers more of an incentive to include it.
As for the games which currently don't support these wonderful technologies, well, that's where the remainder of this article comes in.
Tuning In-game Settings to Improve Performance in Games
The next stop on any frame-hunter's list should be in-game settings. As tempting as it might be to whack every slider to the max, or use the ready-made presets available, both will hamstring your gaming experience in one way or another. Setting everything to its highest option will almost guarantee a stunning but jittery slideshow, whilst using a preset could mean you're forced to skimp on areas which actually don't hit performance too hard at all.
Although the thought of fine-tuning in-game settings sounds like a laborious task, and one that no one wants to do before they play a shiny new game, arguably the time it takes to do this is countered by the performance gains you'll see. And ultimately, it'll make the gaming experience more enjoyable in the long run. Plus, once you're familiar with the typical culprits, it takes no time at all to hop in and make the necessary adjustments.
So, what are some of the most demanding in-game settings and which should you tweak first?
Resolution
Resolution will have one of the biggest impacts on your framerate when it comes to gaming, with thousands upon thousands of pixels needing to be processed by your graphics card. The higher the reolution, the more demanding the workload for your GPU, so setting a lower resolution can help restore a healthy helping of frames.
![]()
Although dropping your resolution wouldn't necessarily be my go-to suggestion for someone on a 1080p or 1440p monitor, if you're one of the few gamers rocking a 4K screen, this is actually a great compromise if you still want to keep those in-game settings maxed out. Whether you're at a desktop or using a Home Theatre PC (HTPC) with a hefty TV, knocking the resolution down to 1440p from 4K will give you a huge FPS boost without losing too much visual fidelity in the process. What's more, if you feel the image needs to be a little sharper to account for the lower resolution, you can offset this by tweaking a few GPU settings (which we'll cover in more detail later).
Field of View
Commonly thought to be more of a preferential setting, FOV is actually one of those settings which can have a fairly significant effect on performance. As you increase FOV, you also increase how much you can see in-game - in other words, your GPU will have to work harder to produce a single frame, since it needs to render more of the game world. If you don't tend to have any issues with nausea and you aren't looking to gain a competitive edge over other players by increasing your peripheral vision, then experiment with dialling this setting down.
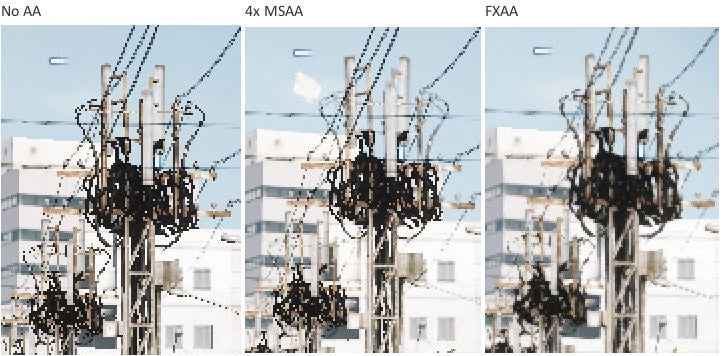
Anti-aliasing
No matter how realistic games may look they all share one thing in common; they're displayed via thousands of pixels on a screen. Alas, until we reach a stage where monitors sport pixel-counts beyond human perception, this means that finer details can be subject to a degree of pixilation whereby small in-game objects, like blades of grass or chainlink fences, can end up looking a little jagged and unnatural. Anti-aliasing seeks to reduce these rough edges by using a filter which "smooths" them, making the game world appear softer to the eye, and more akin to how we see our own world (since we can't perceive the very atoms that make up everything around us!) But, as you've probably guessed, this does come with a suitable performance hit to match.
Anti-aliasing comes in a few different flavours which are as follows:
FXAA is one of the most performance friendly options and the most efficient, since it's applied to an entire frame. However, this does mean the frame can take on an almost blurry appearance, instead of simply looking smoother.
Meanwhile, MSAA only applies the effect to the areas of a frame which need it, but is slightly more intensive. You'll often find that MSAA comes in 2X, 4X, 8X, and 16X strengths, with each producing a better effect at the cost of additional performance. In comparison to FXAA it can offer much cleaner looking edges at 8X and above.
Alternatively, NVIDIA and AMD also offer their own anti-aliasing techniques, CSAA and EQAA (sometimes CFAA). Both work similarly to MSAA but have far reduced resource costs. There's also TXAA which uses a combination of techniques from FXAA and MSAA, in an attempt to offer the "best of both worlds," though blurriness can still prove to be an issue for some gamers.
Lastly there's SSAA, which is by far the most effective and efficient means of smoothing those jagged edges, but is also by far the most intensive. Whereas something like FSR or DLSS use up-sampling to save GPU performance, SSAA instead uses down-sampling, taking a higher resolution image and then scaling it down to "smooth out" the harsher lines.
Generally speaking, TXAA is considered a fairly balanced option visually, with FXAA being inferior. So, if you need to have anti-aliasing enabled, it's advisable to use TXAA, or a lower MSAA setting for the best results.
Ambient Occlusion and Shadow Quality
Throwing shade might be easy for irked Twitter users and Redditers, but for your GPU it's one of the most taxing tasks when it comes to gaming. Shadow Quality and Ambient Occlusion are two such settings which can really help add depth and realism to a scene, and can help take a game from looking good, to looking great, but at the cost of lower framerates.
Shadows are often handled in a variety of ways, one of which is frequently referred to as Shadow Quality. This is generally a sort of "catch all" setting that can allow you to quickly regain some frames by turning it down. Usually this just results in slightly less "clean" shadows which have less detail, and in some cases, it'll even mean certain areas won't have shadows cast at all. The latter might sound somewhat extreme but in practice this isn't all that obvious whilst you're busy running around and interacting with the game.
Alternatively, if you want to keep shadow detailing higher, you can look at the various types of Ambient Occlusion instead. Ambient Occlusion is the method by which the game calculates where and how dark shadows should appear, specifically when light is reflected from a direct light source, such as in the case of light coming into a scene from a window.
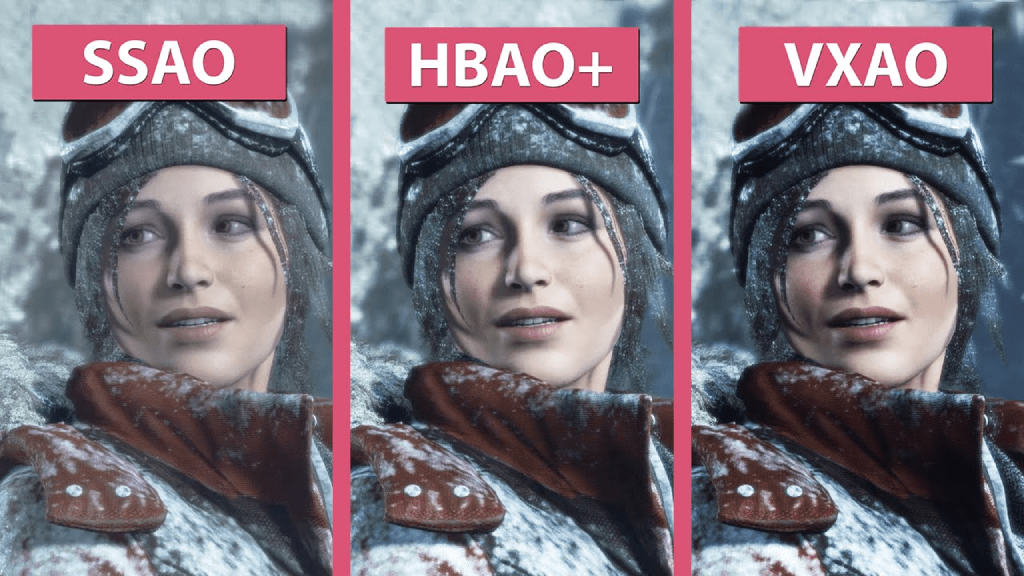
For some games, this is just a simple on/off setting, as the effect can be relatively insubstantial for the relative performance blow, depending on how it has been implemented. But for many titles it plays a large role in adding depth and realism to their environments, and as such, they allow you to choose from SSAO, HBAO/HDAO (including HBAO+), and the far newer but far less frequently used VXAO.
SSAO is the simplest and most framerate-friendly of these methods, and if Ambient Occlusion is a must for your favourite titles, then this is your best bet as far as performance goes. Meanwhile, the more demanding HBAO is supposed to be a more accurate and realistic method of calculation, though the difference isn't always so stark, and sometimes it can make things appear much darker than feels natural. VXAO however, will give the most accurate and realistic effect of the three, but it will really hammer your GPU to pull this off.
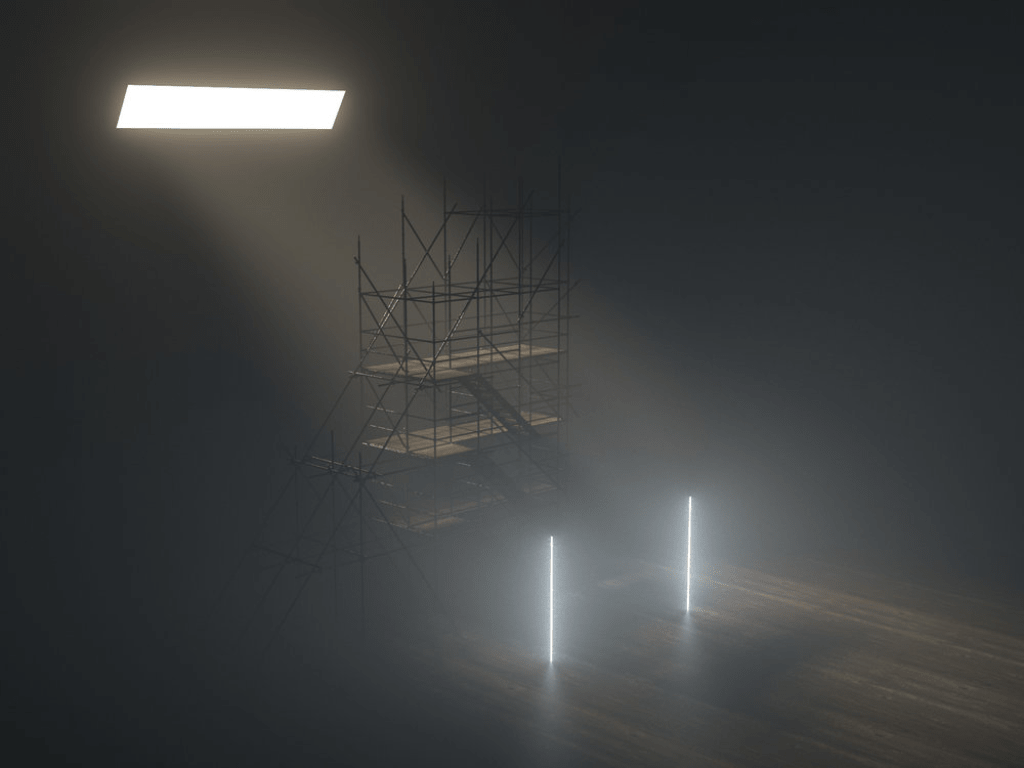
Volumetric Lighting/Fog/Clouds
Pretty much any time you see the word "Volumetric" in a game's settings, it'll be talking about one of these various lighting effects. In essence, what these settings do is allow light beams (sometimes referred to as "God Rays") to pass through what is technically considered a solid 3D object in the game engine. This can be anything ranging from fog, steam, smoke, and dust. Meanwhile, volumetric clouds act as an actual object capable of casting a shadow, as opposed to clouds which are treated as part of a static "sky box". This adds a fantastic level of realism to games and can make the world more immersive than ever, but as such, it also absolutely shreds your PC's performance. Definitely one worth disabling if you need to claw back a good amount of FPS.
Ray Tracing & Reflections
Staying on theme, Ray Tracing is a much newer lighting feature which has been touted endlessly by NVIDIA since about 2018. If you weren't already aware, this method of Global Illumination goes several steps beyond lighting techniques like Ambient Occlusion by literally simulating how light would reflect between surfaces in a scene. That means calculating how every individual beam of light would enter a room and bounce from object to object, all in real-time. As you can imagine (and have probably heard a lot of noise about in the PC community), this is incredibly taxing on your GPU, able to slash performance by as much as 70%.
Not a setting for those wanting high FPS, and certainly not advisable without both a hefty GPU and either DLSS or FSR enabled.
On a similar note, reflections are another setting that can tank performance, especially so in scenes where there's a lot of mirrors, glass, or water present. Both Ray Traced and non-ray traced reflections are pretty demanding, so this is another setting worth turning down, or off, if you want to see a nice boost to your FPS.

Draw Distance and LOD
Last but by no means least we have Draw Distance, sometimes called View Distance, and Level of Detail (LOD). These two settings, as you might expect, handle what you can and can't see on the horizon.
As per its name, LOD determines the detailing of distant objects, whilst the Draw Distance determines how much of the game world your GPU will render, essentially determining where the player's perceived horizon is. Many games employ a multitude of clever techniques to make these two settings as immersive and as performance-friendly as possible, such as by having thick fogs to hide the unrendered or low detail world elements, or having multiple "stages" where objects become progressively less detailed and complex the further away they are from a player.
Despite these efforts though, with the rise of larger and larger open-world environments, the demand on PCs has become greater and greater. Ergo, it's definitely worth tinkering with these settings to find a good balance between immersion and performance.
Tuning Windows 10 settings and your hardware
Sometimes you just don't want to turn down in-game settings if it can be helped, or else you might find that you can only turn settings down a pinch before the game starts to resemble flat playdough. Well, in that case, you can turn to Windows 10 settings and the very hardware you're using to run these games, which we'll explore for the remainder of this article.
Bear in mind that not every one of these tips or tricks will magically grant you an extra hundred frames like DLSS and FSR. On the contrary, many will often net anywhere between 0.5-2 frames max. But the idea is that by gaining a frame here and a frame there, these small increases will add up, resulting in a much larger framerate gain overall. And if you happen to be stuck at sub 60fps, even just another 10-15 frames can make a hugely noticeable difference.
Optimising Windows 10 for Gaming
Within Windows 10 there's a myriad of options to choose from when it comes to tuning both your hardware and the OS itself. The quickest and easiest of these options are Game Mode and Hardware Accelerated GPU Scheduling. The first of these settings can be found by simply typing it into the Windows Search Bar, whilst the latter you can find by right-clicking the desktop and choosing Display Settings, then Graphics Settings.
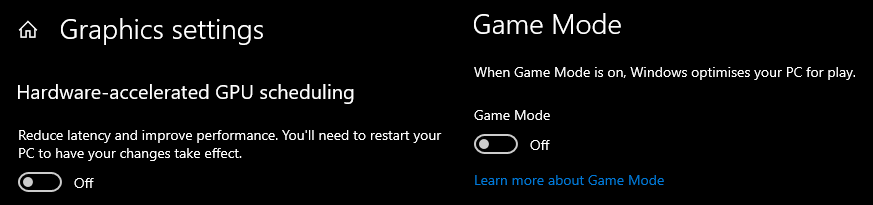
If you happen to be using particularly old hardware, then these settings can actually help you gain quite a reasonable performance uplift, in some cases boosting FPS in games by around 10%. However, it has been noted that it can also slightly lower performance by 1-2% in other games, and especially so for those already using decent mid-range or better hardware.
Although these settings can't necessarily guarantee a performance uplift, they can work better for some than others so, for the sake of a few clicks to find out how beneficial they are, there's really no reason not to give them a try.
Hardware Power Management - improving your PC's Performance with Windows Power Plans
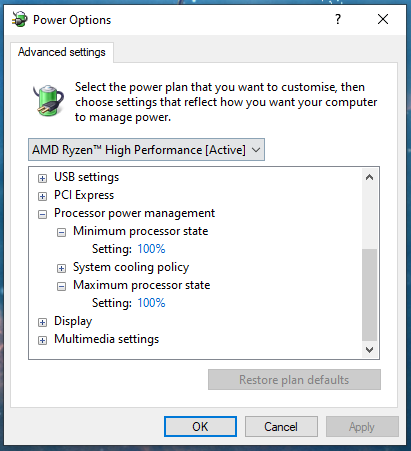
Before getting into hardware specific tuning, there's a few more settings within both Windows 10 and your GPU control panel that can be tweaked to favour performance in games. The first of these are focused on system power management, and we'll start by checking the CPU.
If you've read our blog on CPU Throttling and Thermal Throttling, then this will be fairly familiar to you. But in essence, by default, many PCs use a "Balanced" power plan to make the processor more efficient. This can sometimes come at the expense of performance in games as your system tries to dynamically adjust the power throughput of your CPU based on several variables, including demand, power limits, and temperature.

CPU Throttling and Thermal Throttling Explained
Learn MoreNavigate to Power Options (either using a Windows Search or the Control Panel), and ensure that you choose the High Performance plan. Once selected, choose Change Plan Settings and click on Change Advanced Power Settings. Under the Processor Power Management option, ensure that both the Minimum and Maximum Processor States are set to 100%, as well as checking that the System Cooling Policy is set to active. By making these changes we are essentially telling the PC to keep the processor running as fast as possible, prioritising performance over thermals, noise, and power efficiency.
GPU Settings that can Boost Gaming Performance
With the CPU taken care of, we can now similarly address our GPU. How you do this will differ depending on whether you are using an NVIDIA or AMD card, but fundamentally the end results are the same.
For NVIDIA users, right-click your desktop and select NVIDIA Control Panel to open the application. Then, under 3D Settings, click Manage 3D Settings. From here, you'll be able to scroll through the Global Settings tab until you find Power Management Mode, which you can then set to Prefer Maximum Performance.

As for AMD users, open Radeon Settings and navigate to the Performance tab, then select Tuning. Here you should see a number of presets including an option entitled "Rage" mode.
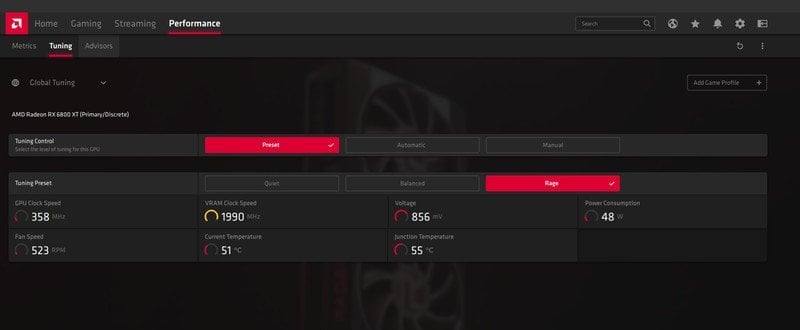
Enabling these options effectively allows your GPU to draw as much power as possible in an attempt to keep clock speeds consistently high, potentially improving the performance of your PC but at the cost of power efficiency.
Whilst we're on the subject of GPU control panels, there are some other settings worth checking which will help ensure your in-game framerates are as high as possible. These are the Low Latency Mode and Texture Filtering Quality as seen in the NVIDIA control panel, also under Global Settings. Note that these are also available in Radeon Settings for AMD users too, though the Low Latency mode is referred to as Radeon Anti-Lag.
Though the low latency modes allegedly offer increased click-to-response times, it does come at the cost of potentially lower framerates, so setting this option to disabled can help to somewhat improve FPS.
Meanwhile, the texture filtering quality can be set to favour high performance rather than high quality, which once again, will net you some extra frames. Alternatively, it can also be set to a balanced mode, but the difference in visual fidelity is so minimal between the performance and quality modes that I'd always suggest going with the high performance option.
Additional GPU settings to improve FPS
Resizable BAR, or Smart Access Memory (SAM) as it's called by AMD, is a more recent feature to be supported by the latest 30 series and 6000 series GPUs. Provided it is supported by both your processor and motherboard, this technology allows your graphics card to communicate directly with your CPU. This can yield a performance boost of up to 10% depending on the application in question, so if your favourite game supports the feature, it could well be worth enabling.
It's fairly straightforward for AMD users, and a little more complicated for NVIDIA users, but both companies offer useful guides for checking your system's compatibility and supported games too, which you can find here for AMD, and here for NVIDIA.
Finally, we also have an option known as Image Sharpening and GPU Scaling. Essentially just a clever filter/post-processing effect that the GPU can apply to supported 3D applications, using this feature alongside some of our earlier in-game suggestions allows you to recreate a sort of pseudo-FSR/DLSS effect by lowering the resolution of the game and fine tuning this setting to counter any perceived blurriness. This will be heavily preference based though, as some gamers may find the effect visually underwhelming or insufficient, which can make it hard to justify even for the FPS gain you'll see. But it's worth a try all the same. You can even set it on a per-game basis too, which can be useful if the effect works better in some games than others.
Entering the world of overclocking
With the way technology has evolved over the years, overclocking has become increasingly less relevant as hardware manufacturers have provided more and more performance out-of-the-box. However, when it comes to garnering every last frame possible, it still serves as a valid option for squeezing just those few extra frames out of your GPU and CPU.
Though we won't be covering a full in-depth guide to overclocking today, we will take a look at a few very simple, and more importantly, safe options that can help you push your hardware to its very limits, ensuring you get the maximum performance possible in-game.
Boosting GPU power limits even further with GeForce Experience and Radeon Settings
As we mentioned in an earlier section, the more power you can supply to your GPU, the more likely it is to be able to boost to higher clock speeds, or at least maintain its boost speeds more consistently. Fortunately for gamers, NVIDIA and AMD both offer some easy to find sliders that can push your GPU's potential further by upping their maximum power draw. And don't worry, these sliders are full-proof with a hard maximum cap set by the card vendor, in order to prevent anyone from frying their GPU and burning down their house.
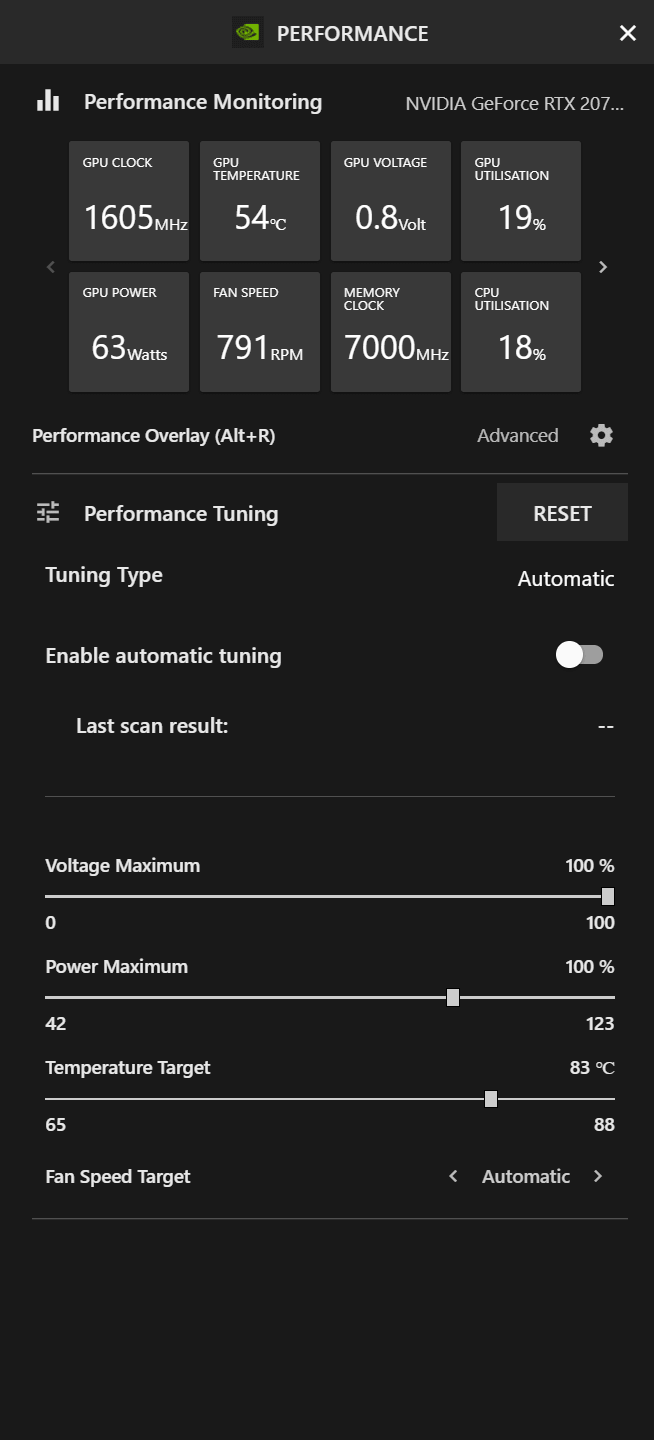
For NVIDIA users, pressing Alt+Z will open the GeForce Experience Overlay - here you'll find the Performance Tab which will open a side panel listing the current statuses of your GPU, as well as the aforementioned sliders. In this case, you'll want to adjust the Power Maximum slider.
As for AMD, in Radeon Settings under the Performance and Tuning Tabs is where you'll find your controls. However, you'll need to select the Manual mode first, then adjust the slider under Power Tuning labelled Power Limit.
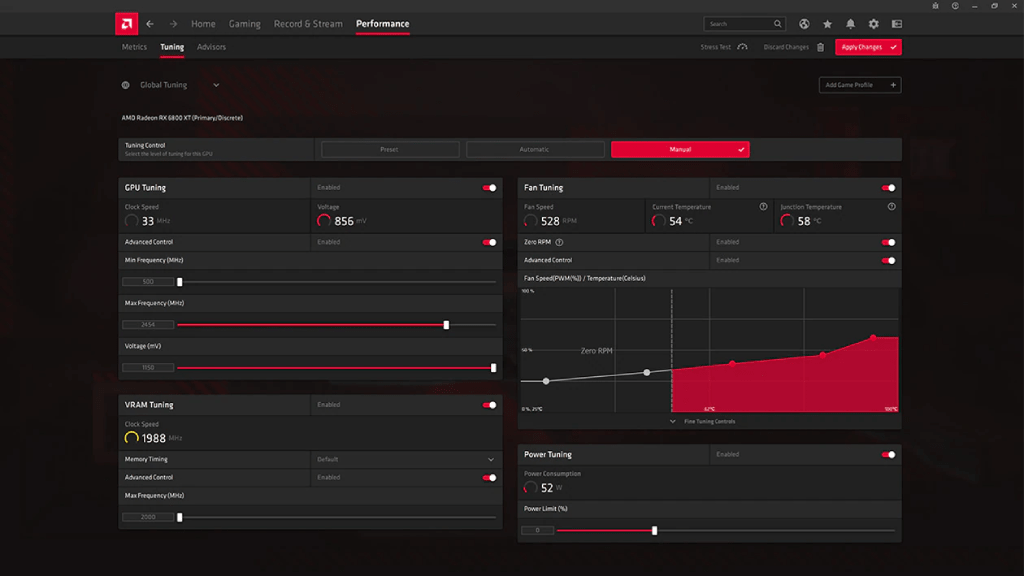
If you want to take things a step further, you can take advantage of that additional power draw by forcibly dialling up the clock speeds of your GPU. This can be done automatically for NVIDIA by opening the Performance Tab mentioned above, and clicking Enable Automatic Tuning. Radeon also has a few preset options, and an automatic mode too, though you'll need to give up control over the Power Limit slider in this case.
GPU Overclocking with MSI Afterburner
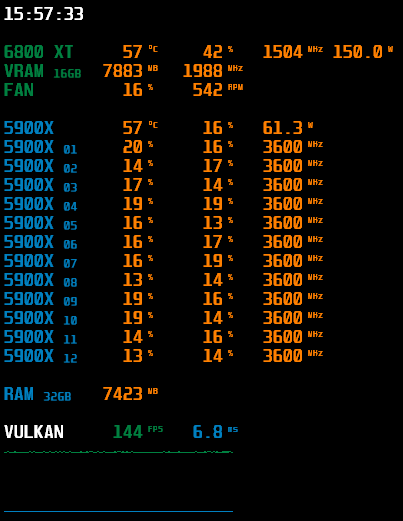
A better alternative to both of these however, is to install MSI Afterburner; an extremely useful tool compatible with any GPU, and one which comes bundled with the RivaTuner (that on-screen FPS and hardware statistics monitoring tool you might have seen in benchmark videos).
Similarly to NVIDIA and AMD's tuners, Afterburner is a really safe tool to use and it gives you the best of both companies' software in one place. You get the far more granular control over your GPU in the same way as with Radeon Settings, it includes an automatic overclocking option similar to (and much better than) NVIDIA's, and it even allows for multiple profiles to be saved. What's more, it's UI is much simpler, more self-explanatory, and can even be customised to better suit your preferences when it comes to styling and accessibility.
Before you start adjusting sliders, you'll need a suitable benchmarking tool in order to test and track your overclocks. I'd recommend either of the Heaven or Valley Benchmark tools from Unigine, both of which allow you to save results after each test for easy comparisons.
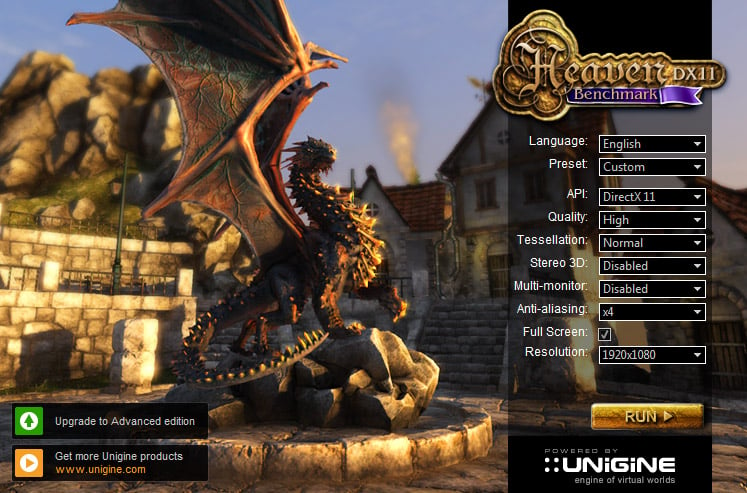
Which you choose doesn't really matter, the main priority is to use the same test to keep things consistent. Once you've chosen and installed your benchmarking software, run your first benchmark to find out what your baseline is, and make sure to save the result somewhere easy to find for later (such as on your desktop). I'd also recommend that you name the .html file to something that indicates this is your baseline, such as "Unigine_Heaven_Benchmark_No_OC".
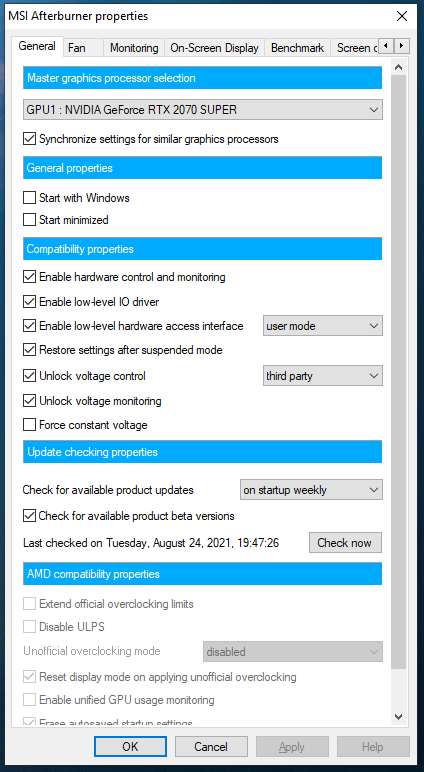
To get started with your overclock, click the cog icon to open settings. Then under the General Tab, make sure to check the boxes labelled Enable Hardware Control and Monitoring, and Unlock Voltage Control/Monitoring, then click Apply. This will unlock all of the relevant sliders so that you can begin fiddling with power draw and clock speeds.
First, set the Core Voltage and Power Limit sliders to their maximum (which should also automatically raise the Temperature Target) and click the tick to apply the settings. The next step is to start increasing your GPU's clock speed. With any kind of overclocking, the best way to find a stable overclock whilst avoiding crashing your PC, is to do this is in small increments. Start with 10-20MHz on the Core Clock, apply the change, and do a benchmark. Once you've confirmed the overclock is stable, you can add another 10-20MHz at a time, making sure to apply the changes and test them in a benchmark with each increase.
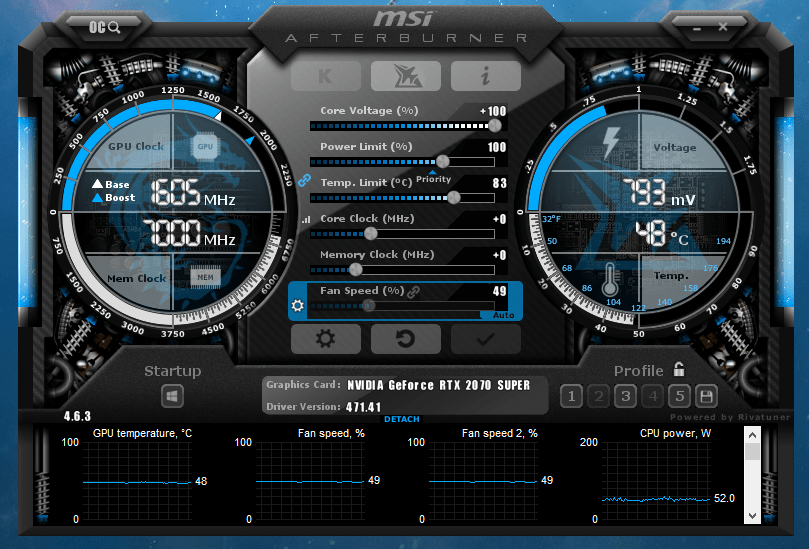
When you've reached the maximum stable overclock for the Core Clocks, you can then repeat the same process with the Memory Clocks. Remember to save the results of each test, and to name them something which easily indicates the exact overclock you were using, such as, "Unigine_Heaven_Benchmark_+55c_+776m".
But how do you tell when an overclock is unstable? Well, whilst you test an overclock it's important to watch through the benchmark, keeping an eye out for anything unusual like tearing or artifacts. Despite most people being unfamiliar with them, artifacts are very easy to spot. There's no one way to explain what they are exactly, but they're certainly one of those "you'll know it when you see it" scenarios. Usually they take the form of unsightly splotches of colour, or almost firework-like stars, which flash up sporadically during a benchmark. In the event that you do see an artifact, you can simply stop the benchmark, either using the on-screen UI or just by hitting Alt+F4.
Once you've dialled in the perfect stable overclock, you can go back through your test results and compare - though overclocking can improve your framerate, it will reach a point of diminishing returns, and in some cases could even make your GPU's overall performance worse. As an example, my own 2070 Super can get up to an additional +75MHz on its Core Clocks, but compared to a +55MHz overclock, it doesn't make much of a difference whatsoever. In fact, it only increases the average framerate by about 0.7, whilst actually lowering the minimum framerate by 2fps.
There's a little bit of trial and error involved, and it can take some time, but if you're looking to get every frame possible and enjoy tinkering, then the effort will still be worthwhile - particularly so for older cards where overclocking headroom was much more generous.
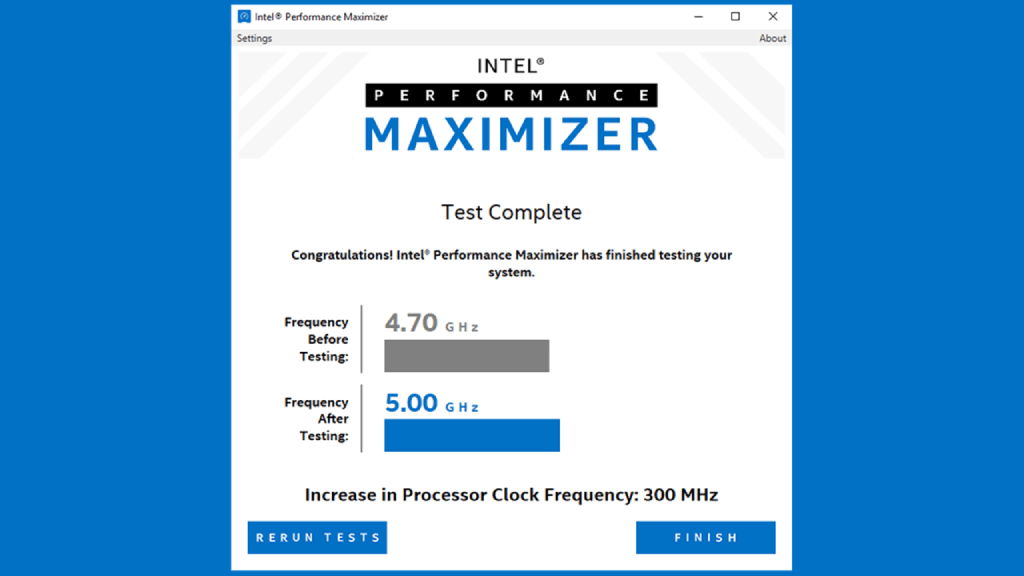
"One-click" CPU Overclocking with Ryzen Master and Intel Performance Maximiser
Fortunately, CPU overclocking is much, much easier - just like graphics cards, modern processors have way less headroom than they used to, so there's very little reason to jump into your BIOS to start tinkering with Voltages and Clock Speeds. Instead, it's much more convenient and far less time consuming to just go with a "one-click" overclock.
Ryzen Master by AMD and Intel's Performance Maximiser both offer this functionality. For AMD users, simply download and install Ryzen Master, then navigate to the Game Mode Tab and click Auto Overclocking. Hit Apply and Test, and that's it. You're done! Ryzen Master will do all of the work for you, then prompt a system restart and re-open on launch to confirm the overclock.

As for Intel, it's even easier. Just install the programme (be sure to have the required 16GB of storage space available for the service to create its partition) and launch the application. It'll then detect what processor you are using and dynamically adjust clock speeds to ensure that it's always performing at its best. Bare in mind though that Intel's K-series processors are the only Intel processors that allow for overclocking, and in turn, these will need to be paired with a Z-series motherboard. You'll also need to be using a 9th Gen or later processor, or else this service won't be compatible with your hardware.
Improving Cooling can also improve FPS
How hot your PC runs is another contributing factor when it comes to getting as much FPS as possible. If your PC is currently an undercooled, dust-filled fire hazard, then you'll almost certainly be artificially limiting your PC's performance. If you're interested to learn more about why this is, or want to find out how to check if your system is running too hot, then I'd highly recommend checking out our article on Thermal Throttling.
When it comes to keeping your components cool, your first port of call should be to give everything a good clean. After that, you can think about the airflow design of your case, whether it needs more case fans, how they move air through the case and over components, whether the CPU cooler is sufficient, and so on and so forth. In essence, the cooler your PC can operate, the longer your components will boost to their maximum clock speeds, which translates into better performance in games.
After a more in-depth discussion on keeping your PC clean and cool?
Head over to the final part of our series on picking custom PC parts.
Read moreIf all else fails, it might be time to upgrade
As much as we love to see hardware being pushed to its limits, sometimes we do have to accept that, ultimately, it does still have those limits for a reason. If after trying everything in this article you still find that your PC's performance just isn't what you'd like it to be, it could well be time for an upgrade.
But which components should you upgrade first? Well, if you hadn't already guessed from the focus points within this guide, your priority should always be with the GPU, then the CPU. Graphics cards are the driving force behind those beautiful in-game graphics, which are the most demanding element of almost every game out there. Meanwhile, the CPU is far more relevant once you start entering the realms of realistic simulation titles, or huge scale war games that see tens of thousands of units fighting on screen at once.
Another potential option, as pointed out just a moment ago, is your cooling solution, especially so if your components are being thermally throttled, which is one of the easiest to fix causes for significant frame drops in games.
Lastly, you could also check to see whether your processor supports faster memory than what is currently in your system. Many processors benefit from faster RAM, and your whole system will benefit from additional capacity (16GB is ideal for gaming) - it's one of the cheaper ways to upgrade a system, whilst helping to boost your PC's performance just that little bit more.
FPS to the Moon!
Congratulations if you've made it this far, there's certainly a lot of options to digest when it comes to boosting your FPS in games. Hopefully at least a few of these suggestions have helped you increase your PC's gaming performance, and if not, then perhaps it's helped you realise that your poor PC is well overdue some shiny new parts!
If you have any additional tips and tricks that you think might help, have thought of something I may have missed, or have any questions about anything in this article, please do hit us up in the comments down below!
Posted in TechShot
Published on 27 Aug 2021
Last updated on 09 Feb 2023